Archive | May 2016

Swarm Trap Success – sort of

The plan was to replace the two hives we lost last season by purchasing a package for one and trying to catch a swarm for the other. The logic being that a swarm trap actually cost less than a package or nuc and the bees would be local and strong and ready to go. After the first swarm, any bees caught would basically be free! The next part of the logic was a trap would be easier than finding a swarm in a tree and “dropping” into a box and then into a hive. Well…..

We bought the trap on eBay and I would highly recommend the seller Riley Honey Farm. He answered our questions, made suggestions, and even called me during this whole fiasco to offer advice.

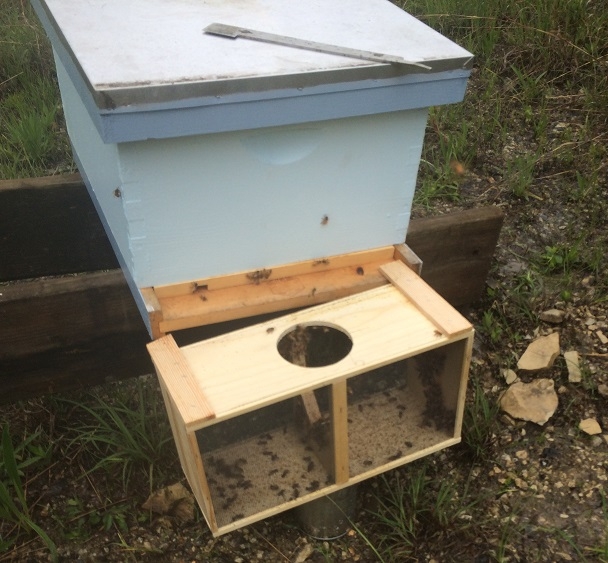
So the trap was placed according to all the things I could find on the internet. Up in the fork of a tree, near water, near forage, morning sun, afternoon shade, blah, blah, blah.

Bee Swarm Trap

This bee swarm trap is installed on the edge of the glade.

Then we waited. A bit over zealous I placed it out on April 1st, a little early for our area but didn’t want to miss any swarms. On sunny days there was activity at the trap which made me feel good about the trap placement.

Last Tuesday our package of bees arrived, read about it here “Bees are back in town”. That was a cold rainy day, but the weather improved on Wednesday and the traffic at the trap significantly picked up. We began to worry our new package was considering moving out of the hive and into the trap. I kept a close eye on both and then it happened on Thursday afternoon some time between noon and 2pm (yes I was checking every couple of hours) the swarm arrived.
[embedyt] http://www.youtube.com/watch?v=YijbrMjf3v8[/embedyt]
I was so excited! The sheer number of bees let me know this was not my new package of bees. Now I waited for the swarm to move into the trap and carefully planed my next moves to get it into a hive. Because the new hive location was close, I understood I needed to move the trap at least three miles away for at least a week and then I could move it back without worry of the bees returning to the original trap location.

Swarm trap day 1

Swarm trap day 1

Swarm trap day 1 side view

Swarm trap day 1 side view


So we waited, as slowly over the next three days the bees moved under the trap and along the main tree trunk.
Swarm trap day 2

Swarm trap day 2


And waited, on Friday afternoon I baited the hive and placed it at the base of the tree about 3 feet off the ground hoping they would move in directly. No luck.
Swarm trap day 3

Swarm trap day 3


We had a family wedding to attend on Saturday so there was no time to mess with the bees, but I was seeing a lot of bees dancing/wiggling on the swarm and was worried the bees might be getting ready to move to a new location.

Sadly here is where the pictures end, but early Sunday morning (3 days after the swarm arrived) we suited up and decided to “place” the swarm in the new hive. First I brushed the bees into a cardboard box which was easier to handle up and down a ladder than the hive box. My lovely wife would then dump the box contents into the hive. At this point the bees were a bit cranky, so we moved quickly. Almost too quickly, there were bees everywhere. Since the bees were basically on the main trunk of the tree at this point I was making a sweeping motion with my bee brush and missing the box with a lot of bees. We did what we could and then stood back. Almost immediately the bees on the top of the hives started fanning, butts in the air. This behavior indicates the queen was most likely in the hive and they were spreading scent to let the other bees know the new location. We left it alone for about an hour and a half and by then the tree only had a few stranglers left and the hive was full. I placed the top on it and transported it to the new location.

As of Tuesday morning the new hive appears to be doing well. There is what I would consider normal activity, coming and going, and even pollen being brought in. We will give them a week or so to settle in completely and then do a hive inspection on both hives to confirm we have a laying queens. Fun, fun, fun!

After talking with trap maker, we decided this most likely happened because a frame was blocking the trap entrance. The new design has a block on the frame rail to keep this from happening. When I re-installed the trap I removed two frames and pushed the others to the outside. I checked it again after climbing the ladder and before securing the trap to the tree to make sure no frame was near the entrance and the next swarm could walk right in!

Bees are back in town!

Last season we started with two new bee hives and lost both in the late fall early winter. Details here. After a long quiet bee-less winter, we now have bees again!

The plan for this year was to buy a single package of bees, since we had hives, comb, and even honey we chose a package over a nuc. For the other hive I spent the money, less actually, on a pre-built swarm trap in hopes we could catch a “free” swarm. More on that later. We purposely bought a package from a local apiary with a late season delivery in mid-may. The hope was with the delivery during full bloom and the left over honey we would need to feed the new package less.

Trailer Full of Bees

Trailer Full of Bees


So delivery day came and I was off to meet a guy with a trailer full of bees in a random parking lot. Felt a little like we were doing a secret deal, but it is all on the up and up – I swear. The interesting part was even though we had this late date, it was cold and rainy. Like 45 degrees cold. Being new I asked the guy about installing the package in the bad weather and he says “well they install them in the snow up north” and went back to his delivery of bees. Good enough for me, I guess.

A quick check of the weather showed it would stop raining late afternoon and might make it into the mid 50’s. I took the bees home and sprayed them with a 1:1 sugar solution to make sure they were feed and waited for the rain to stop.

Box 'O Bees

Box ‘O Bees


One winter project was to build a true hive stand and to relocate the bees to a sunnier location. Both of these were a plan to reduce the hive beetle infestation. The new hive stand was copied from many found on the internet and consisted of two 2X6’s screwed to spacers about 11 inches apart. Last year the hives sat on these same boards laying flat, which didn’t allow for proper airflow under the hive and through the screened bottom board. So better ventilation and early morning sunshine – check! Since everything here is on a hill, a couple of cinder blocks were called into service to level the stand, plus get it off the wet ground.
Hive Stand

Hive Stand


I laid out the items I needed for the install on the hive stand before getting on my bee suit. Something about “shaking” a couple thousand bees around called for a little protection. In this picture you can see my hive tool, a spray bottle of sugar water, the hive components, and the package of bees. The two wooden shims are used to level an internal feeder.
Package Install Tools

Package Install Tools


Here is where I wish I had more pictures, but due to the bee suit and crappy weather I moved quickly to finish the job. First I sprayed the bees with sugar water to calm them and make them busy cleaning themselves. Next while holding the queen cage tab, I removed the can of sugar syrup shipped with the bees and then removed the queen cage. Checked the queen was alive and well before placing her cage between two frames with the screen facing so the other bees could still see and feed her. Then the fun part, I turned the package upside down and “gently” shook the bees out and into the hive between a couple of frames. I know there are a lot of folks online now saying this is too rough on the bees or not the way to do it. In this case due to cold weather and impending rain I wanted as many as the bees as possible inside the hive and closed up so I went old school rough! After closing up the hive, I placed the package out front in hopes the last few would find there way inside.
Bee Package Install Complete

Bee Package Install Complete


Swarm trap update:
While the trap has been out since the first of April there had been little activity until around the first of May. While on most sunny days we see a handful of bees coming and going, these are most likely scouts attracted by the smell of the frames and the swarm trap lure. I keeping looking for A LOT of bees or at least a few bringing pollen into the trap. The weather really hasnt been great, so we are hoping the next week of warmer weather being promised will cause a swarm to find it’s way to our trap. 🙂
Bee Swarm Trap

This bee swarm trap is installed on the edge of the glade.

ShelbyFest 2016

So not everything we do is about homesteading. I personally love muscle cars and specifically mustangs, all years, all styles, modified, full restored, etc. etc. etc. So even though it was Mother’s Day weekend my lovely wife got us invited to go to Shelby Fest in Jefferson City, MO. The weather was crazy good, the cars were out in numbers and couldn’t have asked for more. One of the highlights was at noon the do a tribute to armed services where they start up all the cars. It was crazy the rumble of horsepower bouncing off the buildings in downtown. I highly recommend the show if you love Shelby’s.

Check out our Instagram account (stone_hill_ridge) on the right sidebar or here are a few samples:

Shelby Fest 2016 Jefferson City Missouri

A post shared by Stone Hill Ridge (@stone_hill_ridge) on

Shelby Fest 2016 Jefferson City Missouri

A post shared by Stone Hill Ridge (@stone_hill_ridge) on

Shelby Fest 2016 Jefferson City Missouri

A post shared by Stone Hill Ridge (@stone_hill_ridge) on

Shelby Fest 2016 Jefferson City Missouri

A post shared by Stone Hill Ridge (@stone_hill_ridge) on

Shelby Fest 2016 Jefferson City Missouri

A post shared by Stone Hill Ridge (@stone_hill_ridge) on

Shelby Fest 2016 Jefferson City Missouri

A post shared by Stone Hill Ridge (@stone_hill_ridge) on

Shelby Fest 2016 Jefferson City Missouri

A post shared by Stone Hill Ridge (@stone_hill_ridge) on

Shelby Fest 2016 Jefferson City Missouri

A post shared by Stone Hill Ridge (@stone_hill_ridge) on

Homestead fitness – chicken run

The morning started out great! Woke up and watched a wild turkey crossing the hillside out my bedroom window. Got up and got ready. Strolled down the path the let the chickens out, taking pictures of new blooms (see below) and as I approached the coop I saw movement outside. And then I realized that the chicks I had moved to the coop this weekend had escaped and were running about!

I figured they would get out of the brooder box at some point, but the coop has a 8 inch step up to get out AND the door was closed!!!! Still no idea how they got out of the coop, but I didn’t have time to figure it out as I began chasing them around the coop. So the good news is that most of the chicks are cornish-cross meat birds and as expected when I dropped a little feed on the ground they came running to me. Snatched a couple up and returned them to the brooder box. Then it got interesting, the other chicks are barred rock roosters – to replace Kazooster RIP. These guys were not fooled so easily and I spent the next 10 minutes chasing them through the woods hoping they would tire out before I did! Finally cornered and captured them. With all of them back in the brooder box, I did some maintenance on the chicken wire cover that allowed the escape. Fingers crossed it will hold for two more weeks until I can release them on purpose.

Check out our Instagram account for pictures of the blooms I was enjoying before the chicken chase started!